Designing Curves, Easements, and Super-Elevation For Smooth Running On Model Railroads
Super-elevation is term used on real life-sized railroads when the outer track rail gets elevated thereby compensating for the centrifugal forces occurring when a freight or passenger train transitions a curve at speed.
Put simply; super-elevation is the difference in the height elevation of the two edges of track. It is commonly seen where the railway has a curve… providing a banked turn by raising the outer rail. This, in effect, permits a train to traverse a curve at a much higher speed than would have been otherwise impossible.
© Copyright http://www.modelbuildings.org All rights reserved.
A system like this serves to neutralizes the dramatic effects of lateral forces. Such a system can provide more balanced load distribution on each rail thereby reducing wear and tear on the rails and on the rolling stock as well. Additionally, this system facilitates the smoother operation of trains (providing a more comfortable journey for passengers, and freight). When designed and also operated correctly, it should reduce the possibility of train derailments.
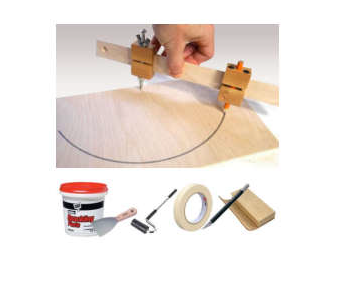
If you are planning curves (with or without super-elevation), then here is a list of the items needed for laying out your curves, the approaching easements into and out of the curves, as well as the super elevation when the curves are in place.
1. Pre-cut curve templates, or trammel points
2. Spline (metal yard stick).
3. 3/4″ masking tape
4. X-Acto knife
5. Rubber J roller
6. Roadbed and nails
7. Spackle for filling gaps. Needs to be suitable for sanding and nonshrinking
8. 3 inch Putty knife
9. Sanding block
10. Track and spikes
Easements In and Out of Curves
Whether it’s on a real railroad on a scaled down model; straight track shouldn’t suddenly change into curved track. It is all about transition and easing into an approaching curve and easing out of it at the other end. If the curve is too sharp, or too steep it is just a problem waiting to happen.
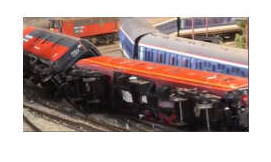
Coupler connections can be particularly problematic on sharp or sudden curves, and even if the cars do stay coupled, the train can look unstable if it lurches awkwardly into a curve. This problem can be solved with the right curve radius and a suitable transition easement allowing trains to gradually flow into the curve rather than having to lurch suddenly.
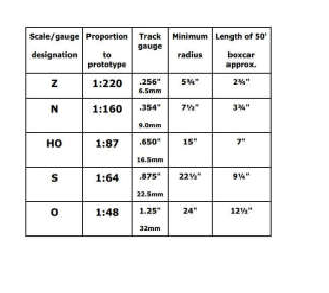
It is worth noting at this point, that scale model autoracks, long passenger cars, intermodal equipment and big steam locomotives will need a larger curve radius than shorter rolling stock such as switch engines and ‘shorty’ freight cars. One option is to decrease the minimum radius by increasing the distance between cars, however this can affect the visual look of a train and make it appear less realistic. This chart is a guide.
On a model railroad, scale curves can be laid out using templates. There are various ways of making templates including using a router with a circle cutting jig and wood, or simply make your template from a scrap of cardboard using a piece of string tied to a center point nail to form an arch. You don’t need fancy equipment.
The two key points in creating a rail easement are:
1) The easement should start and end equidistance from the closest tangent point between the straight track center line and the curve.
2) The center line of the easement should cross midway between the ‘offset’ (e.g. in HO – 114″ is enough) distance of the tangent line and the curve