
How to Build a Model Railroad Windmill… And, How Animated Models Can Bring a Railroad Layout to Life by Enhancing the Overall Scenic Effect
By Kevin C.
Adding animation to certain parts of a model railroad can make it more realistic but not so much that it takes the interest away from the railroad,
Instead it will enhance your layout. I started out by reading “How To” model railroading articles in magazines and what other people had written and how it helped me, so now I can pass on the ideas that I have come up with. In this article I explain how to build a model railroad wind turbine (windmill).
Collecting Old Train Parts and Junk
First off you need a good junk box, I never throw anything away. My junk box is actually three drawers in my work desk. It includes all things trains: spare electric motors, gears from computer printers, DVD players and model cars, helicopters, and servo units from radio controlled aircraft that my son has crashed. I also have magnets of all sorts from stick on to the small disk types. There is a large assortment of plastic from old kits broken or whole. I also have a collection of brass extrusions, brass sheet, and shim material. You name it and I’m bound to have it. There is a whole other drawer devoted to electronics boxes of resistors, transistors, integrated circuits, capacitors, diodes, LED’s wire and transformers etc. My bookcase is full of books on trains, electronics, and landscape and scenery ideas.
© Copyright http://www.modelbuildings.org All rights reserved.
How I Got Started Building an Animated Windmill to My Model Railroad Layout
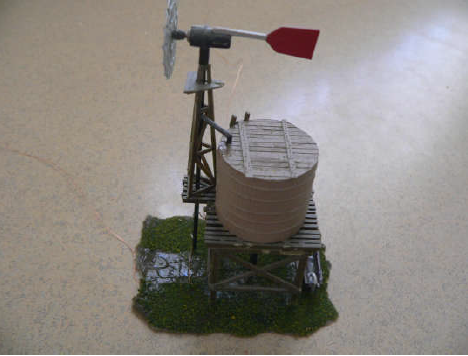
A few years ago I bought an Atlas homestead kit comprising a farm house and a windmill (wind turbine) atop a water tank on a stand. This is a plastic kit and I put it together as per the directions. I read an article about a modeler that wanted the windmill to turn and he did this by vibrating the stand.
In my junk box I had a helicopter that my son used to fly inside via an infrared remote. It had crashed and destroyed most of the rotor systems, but
it did still have two low voltage electric motors. I decided to use the tail rotor motor as it was very small and looked like the gear box that the windmill had at the top. After I few trials I had it glued to the top and the wind propeller fitted to the shaft. It originally ran on 3 volts DC but it would run at the right speed on .8 of a volt. So I added a resistor of 1 watt size to the positive lead to reduce the voltage. I used an old 3.7 volt phone charger as the power supply.
The 1 watt resistor needs to be 100 to 220 ohms depending on the power consumed by the electric motor. Wiring up to the motor I used thin copper enameled wire from an old transformer and ran it up the water pipe and glued in place and painted black so that it can’t be seen. It ran under the base board to heavier wires that I ran back to a switch on my control panel where I placed the resistor. You could use the same thing on a wind generator on a more modern layout.
How to Use Servo Units for Model Railroad Animation
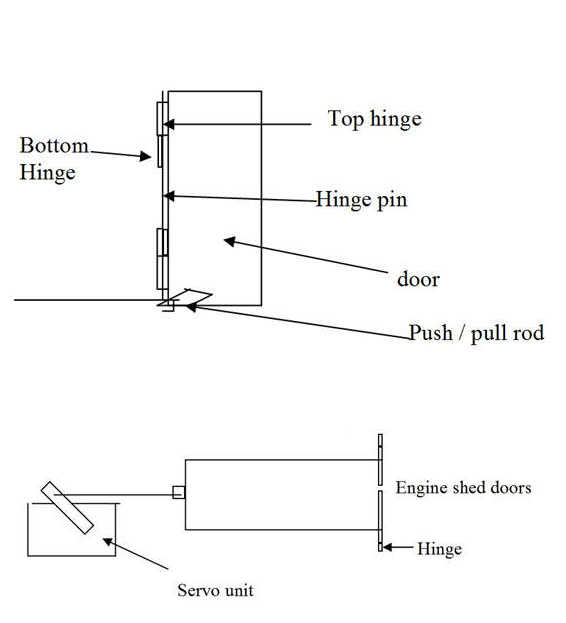
Another animation uses a servo unit from a radio controlled aircraft and this is used to open and close the doors on an engine shed. I had to make the hinges for the doors first using a piece of brass wire that ran the entire length of the doors. And I drilled holes in some scrap plastic and glued each piece to the door and the wall of the shed in such a position to support the door. Next I glued a piece of scrap plastic to each door after drilling a hole to attach the push / pull rod (as per the diagram).
The push pull rod runs the length of the engine shed through a hole in the wall and is bent to run across the back of the shed and back down the other side to the other door. A wire is joined to the middle of the back wire and to the servo unit. You will need to make sure that the door opens and closes properly by altering the length of the throw on the servo. See diagram for how to build.
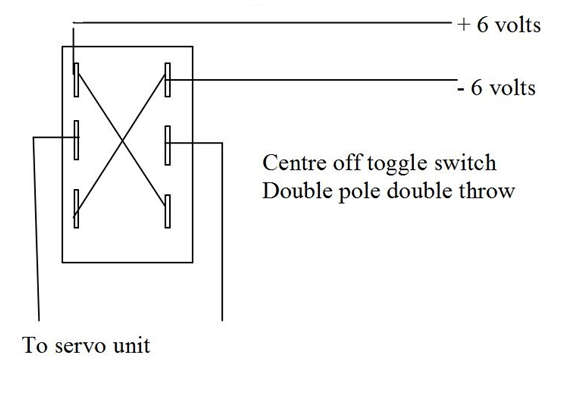
Usually the servos work on 6 volts and can be wired to a centre off switch and by reversing the polarity at the switch you can control the servo from a switch on the control panel. The circuit for the switch follows.
Servos Have Multiple Uses
This switch will work on any electric DC motor that you want to reverse the rotation on. A winch is a good one or if you have doors in a shed that you want to open vertically. To make a segmented door just cut it into even strips and rejoin with a good quality duct tape on one side only. It is ideal for as a roller door.
By lowering the voltage you can make the motor run slower, an old engine motor with a worm and pinion drive will add power to the shaft as well as being turned at a slower rate. If your doors open to quickly just lower the voltage. Now doors on hinges don’t normally open them selves so I glued a railway worker to each door to look as though they are doing the work. With mechanisms’ at the rear of the shed you can hide them by adding buildings and scenery. One word of warning; do not overload the servo unit or it will burn out.
How to Use LED Lights to Complete the Scene
Along with the windmill came a farm house and I added lights inside that can be turned on at night. Using soft white LEDs I split the house up into separate rooms and added a ceiling one LED for each room and in the lounge I added a 5 mm blue flashing LED in one corner at normal TV height, but first I painted three sides of the LED and the top with silver paint and when dried over coated with matt black, the now blue side I faced out into the lounge and wired the LED through a separate switch and appropriate resister to run off 12 volts. When it flashes it represents an old black and white TV set, however make sure there is a TV aerial on the roof otherwise it wont look quite right. By turning the LEDs off and on in the different rooms it now looks as though someone does live in there. However I had to paint the inside of the plastic building to stop light coming through the plastic walls etc
If you want to be more enterprising you could cover the walls with stick on paper like they use to cover school exercise books but use plain colors and over print with your computer printer using scale type designs. As with all animations you should have it looking and acting realistically.
How to Build a Model Railroad Sawmill…Well, How I Went About It
An operating saw mill is always an added attraction on a model railroad and these are quite easy but time consuming to do the first thing is you will need some sort of device to make a log carrier go back and forth. In my HO mill I ran a short length of N scale track to run through the mill. On this I used an old bogie
freight car chassis and built a log holder on the deck bearing in mind that the log has to sit on one side you will need some thing on the other side to compensate the weight, I used a small length old steel plate and cut it to suit, and using the logs weight so that the steel was the same weight.
I glued a plastic girder left over from another project as the guide for the log to be held by down the centre of the deck. On one end of the deck I put a cage with a clear plastic screen to hold the operator.
Now to make it go back and forth I used an old flywheel from a video recorder that was about 4 inches in diameter. A connecting rod and a slider were made to fit between two HO gauge rails. Now the log needed to travel about 4 inches in total.
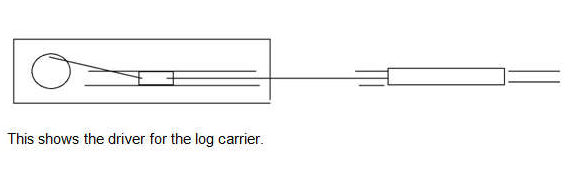
After mounting the fly wheel in its bearings on a piece of 1/4 ply I need to make it turn so I used and old loco motor with a worm drive and attached it to the other end of the shaft holding the fly wheel with epoxy resin. I drilled a hole in the fly wheel to take the connecting rod and made the slide from some 1/4 brass
square stock and milled a slot down two sides the take the guide rails so that they were a nice sliding fit.
I soldered some brass plate to each end of the rails and screwed these to a couple of pieces of ply to hold them at the same height as the fly wheel and attached the slider and brass wire con rod that had been twisted with an electric drill to make it stronger bending it at right angles to go through the hole in the fly
wheel and slider. I then soldered a washer in place so that the wire would not come out of place. Also the wire that operates the log carrier is also bent at right angles through a hole in the slider. And attached to the other end is a flat piece of brass made to fit in the coupling draft box of the carrier. Having worked out how far the driver unit will be away from the log carrier.
More Ideas to Add Realism to a Railway Layout
The driver unit is mounted flush with the baseboard of the layout and glued in place. A small tube may bee needed to help keep the push pull rod in place at the centre of the track and this can be glued in the track the push pull rod will need to be bent to come up to the height of the draft box and these bends need to be as close to the log carrier as possible. After connecting it all up I applied power to the loco motor and regulated the speed by varying the supply voltage. Over the driver unit I placed an office building with a slot cut in the wall so that the building could be removed if needed for maintenance. I put a couple of drops of oil on the moving parts to help keep the movement constant.
Of course you can’t have a saw mill without a saw so I made one from brass shim and cut a saw blade from the shim also. The shaft is soldered into the saw blade and rotated and bent to get the wobble out of it. A small pulley is pushed onto the axle and a rubber band is connected to a similar larger pulley on an
old 12 volt DC electric motor mounted under the base board and wired to a separate switch on the control panel. I spread lots of fine saw dust all around to make it look like the mill had been operating for some time.
Animating objects can certainly add interest and reality to a railroad layout. All you have to do is use your imagination and give it a go. I hope this has given you some useful ideas on how to build a model railroad windmill and sawmill, or at least shown you the way I went about building them.