How To Make Realistic Terrain For Scenery On Model Railroads
We don’t live on a flat earth, and if you force your models to do so they will not be realistic. The type of terrain you choose may vary depending on the type of model railroad you want and the scenery space you have available on your layout.
Early model railroaders used Paper Mache techniques to create features like mountains and hills. Paper Mache can be messy and heavy and you might prefer more modern techniques and materials which are stronger, lighter and much easier to work with. However, if you want use Paper Mache on your scale model railroad, then here is the basic method explained. © Copyright http://www.modelbuildings.org All rights reserved.
© Copyright http://www.modelbuildings.org All rights reserved.
You can also use ordinary paper and cardboard material to provide an undulating scenic landscape, or stacks of extruded foam insulation board (or styrene) which are carved and shaped into the proper land form. The previous techniques can be mixed on any model railroad layout where necessary.
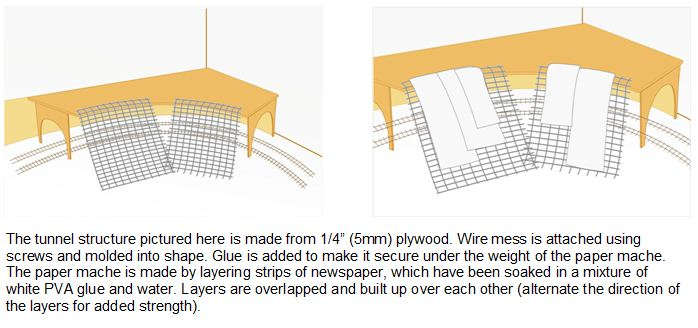
The paper technique uses wadded newsprint to make a basic bump, and then thin cardboard strips are placed over the wad in such a fashion as to
provide an open latticework of strips with openings of 3-4 inches. The newspaper can be made to hold its shape with masking tape, and the cardboard strips can be secured with masking tape or staples to surrounding benchwork. Once the cardboard is in place and arranged to suit, the covering material can be applied.
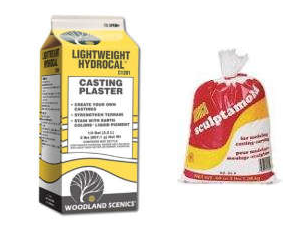
Covering can be done with paper towel squares (use the cheapest ones you can find) soaked in plaster or Hydrocal. Another option is to use the plaster gauze cloth Orthopedists use for casts, or a similar commercial product available from Woodland Scenics and others for railroad modeling purposes. The cloth only requires a trip through a water bath and can then be draped over the cardboard strips until the terrain you are creating is completely covered.

If desired, RIT dye or thin latex paint can be mixed with the plaster to color it a suitable ground shade. This will help at a later stage when the feature is
painted with a base color to simulate ground cover. Experiment with different shades in small batches of plaster before you commit to a large area on your model railroad layout. Since you are going to cover the plaster with another layer or paint or ground cover, the coloring doesn’t need to be perfect, but you do want a plausible earth tone underneath everything.
To create features from foam board (or styrene), the most effective technique is to build up layers of the foam board into the basic shape of the feature, then do fine finishing with a hacksaw blade, hot knife or wire, or a rasp. One drawback of the foam technique is that it tends to make a lot of tiny crumbs of foam that are electrostatically charged and stick to just about everything. A good shop vacuum is a necessity to clean up the mess, and working out of doors is a good idea. The ease of making terrain features with foam far outweighs the mess, though. Also, remember to protect the track from adhesive.
Sculptamold on Model Railroads
In either technique, gaps can be filled in with a product called Sculptamold. It is mixed with water similar to plaster. When packed around the edges of plaster cloth features, it makes a great broken rock simulation on scale model railroads and dioramas.
Sculptamold is very easy to work with and dries quickly. Like the plaster, it readily takes latex paint and washes.
Using Hydrocal For Scenery Making
Hydrocal is a special form of white gypsum cement that can be used to create terrain. It is stronger than plaster of Paris and wears very well. The compressive strength of 5,000 PSI is great for layout terrain base. © Copyright http://www.modelbuildings.org All rights reserved.
Hydrocal is easy to use for soaking paper towels to lay down as base material over screen mesh or paper and cardboard strip forms. It is also a suitable substitute for plaster of Paris when molding rock faces and outcroppings and with a thicker mixture can be used for fill material anywhere there is a small terrain gap on the layout that needs to be covered or filled in.
Using Adhesives For Scenery Making
The adhesives that you use are pretty ordinary and easy to find. You need to make sure that you are working with the following items:
• White glue is often used to help with securing strong bonds onto a surface. It can take a day for the glue to dry out and to disappear from view but it will still be stronger than most of the items it is being used to secure. Remember that white glue is water soluble, but carpenter’s yellow glue is generally waterproof. If you anticipate changes, unsticking things with warm water is a lot easier and less prone to damage than trying to pry up stubborn yellow glue!
• Cyano-Acrylate (Super Glue) works for some items but remember that it’s called Super Glue for a reason. Once something is secured with it, the object becomes impossible to move within seconds.
• You may mix white glue with water or alcohol to create a texture that moves around a surface with ease. It works especially well when securing ballast in an area.