Another 4 Model Railway Weathering Techniques For Scenery, Buildings and Trains
By Kevin C. © Copyright https://www.modelbuildings.org All rights reserved.
1. Decal Fading and Removal
This is a finical part of weathering and what you will need is Decal setting solution, pencil with clean eraser and a hobby knife or scalpel. First you will need a picture of the prototype to follow. Now lay the model on its side and apply a drop of Decal setting solution to the logo and allow it to soak in for a few seconds. I find a fine glass rod ideal. Just dip it in the solution and just tap the glass to let the solution drop onto the model. Sometimes this may take longer depending on how the
decal was applied at the factory. Test it regularly and gently rub the decal with the eraser on the pencil and watch as you go to get the same effect as the photo. It may remove some quickly and its not hard to remove to much. You will not be able to put back on what you remove unless you start with a brand new decal.
Remove the excess dirty solution with blotting paper by using just a corner to soak up the solution and reapply new solution. Once you have the desired effect, allow the solution to set again and gently rub dry with a tissue. If you want to change a car number completely remove the old decal by allowing the setting solution to soak through the old one and apply a new one. If the number is part of the logo decal simply use the scalpel to lightly cut around the old number. You may have to use the blade to lift the decal clear off the car. Decal solution can also remove some of the paint so be careful.
2. Acrylic Wash Techniquer
Acrylic wash is another form of weathering and any type of acrylic paint will do but the best one that I have found is children’s water color sets and go for browns, grays, blacks and earth colors. Dilute with plenty of water and use 10 to 20% paint. This technique is great to do but do not apply to much paint as it is best to layer it. Once finished and before the paint is completely set wipe with a damp cloth or tissue in vertical strokes to simulate rain washing the dirt downwards on the side of the cars and leave a heavier build up in cracks corners etc.. Once dry you can add rust etc from these other weathering systems. All these techniques are best applied to a matt surface and if your car has a glossy finish spray with a clear matt paint but do the decals before painting with cleat matt.
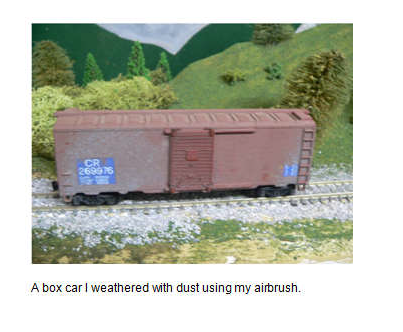
3. Air Brushing
This is just spray painting with a small spray gun, the technique is just the same as painting a full size car etc. the paint is thinned to flow through the nozzle just the same. The thinner the paint is the smaller the spray particles to a certain extent. Some hobby shops sell airbrush paint already mixed to the right consistency and another product is available in small aerosol cans. Weathering with an airbrush is better suited to applying dust but apply it in layers or coats but not so much that you get a solid color build up. What you are looking for is dust and this would look like over spray or a splattering of color in a fine mist. Again this is a technique that would require a lot of practice and a clear space to spray in.
I have a small booth with one side removed and a small extractor fan to take away the excess paint laden air. Also I use a mask to stop breathing in
the paint and eye protection and a disposable hat so that I don’t get paint in my eyes or hair. Preparing the model requires that any area that you do not want to paint has to be removed or masked over so that the paint can’t reach these areas.
4. Distressing Freight Car Sides
Freight cars take a lot of punishment with loads being dropped and forklifts hitting them and this technique can be recreated on your model with a bit of care and practice and a few basic tools. A soldering gun or Iron, a couple of different size flat screwdrivers, a rotary tool with a rotary wire brush and eye protection glasses etc. on gondolas and hoppers you can work on the inside easily but box cars you will have to remove the roof or floor to get inside. Heat the screwdriver with the soldering gun or iron and apply pressure from the inside towards the outside until it bulges taking care not to burst open the melting plastic. This is best done in a well ventilated area as some plastic fumes are toxic. Once you have the car in the distressed state that you want allow the plastic to cool and harden the wire brush the inside of the car with the rotary tool and wear eye protection for this as bits of wire and plastic can imbed themselves in your eyes causing blindness etc. Now the car can be weathered to the degree that you require. An overly distressed car can be placed on a siding with “written off” written on the side in white pen awaiting transport to the breakers yard.