
Useful Info About Scale Model Railroad Rolling Stock, Train Track (Ties and Rails), Ballast – Tools and Weathering
© Copyright http://www.modelbuildings.org All rights reserved.
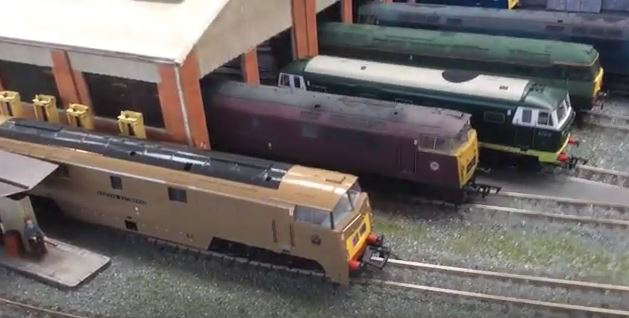
Rolling stock of all kinds is available in kit form and really gives you an opportunity to re-create prototype railroad equipment. Many roads customize their rolling stock with features to better serve their customer industries, and pre-built rolling stock might not be exactly accurate to your roads. Locomotive super detailing with items such as air horns, radio antennae and brake hoses to suite individual roads is a popular subdivision of kit- and ready-bashing. There are some additional tools that are good to have if you are building kits, scratchbuilding or kit-bashing rolling stock.
© Copyright http://www.modelbuildings.org All rights reserved.
An inexpensive digital caliper is useful for all scale modeling, but can be invaluable for measuring wheelset gauging. Similarly, an NMRA standard track and coupler height gauge will keep your rolling stock rolling where they are supposed to. One or more foam cradles are very good to hold your expensive locomotives and prize detailed items while you work on their undersides. You can also make the cradles from foam packing case liner material.
If you are really serious about weathering and painting your models, you might consider investing in an airbrush and spending some time in learning how to use it properly. Along with the airbrush, a homemade or commercial paint booth or box will contain the overspray and keep fumes away from you. Working in an adequately ventilated area is also essential to painting.
Many of the same tools you will use for structure construction are also useful for rolling stock. Car trucks and couplers are equipped with tiny springs, so a special tool to keep them under control will also keep them from streaking off your workbench and into the carpet to be lost forever.
Small curved and straight tweezers are useful to place tiny parts and to hold them in place for gluing or adjustment so that your fingers aren’t included as part of the project.
Track, Rail Codes, Ballasting and Weathering
It’s pretty common to think of the track you lay as just a place for the “real” model to run on, but it’s more than that. The track is a model too. With the exception of Proto-87, most track is not quite to scale. Unless you are going to lay your rails by hand, it is well worth the effort to make the track appear as realistic as possible to disguise the rail height. To be sure, the shorter code rails in most scales approach scale size, but shorter code rail sections in most scales are more expensive than “stock” trackage. Another very common problem with more prototypical track codes is that the scale wheelset flanges are much too large and tend to ride up over the molded ties as the trains move along. Choosing a prototypical code size can also mean an investment in wheelset changes for locomotives and cars.
Most modeling books, articles and videos recommend that you at least paint the rails. This makes perfect sense because the typical rail stock used in track sections is too shiny to appear realistic. A trip to any rail crossing will show that the steel rails are normally rusty brown on the sides and shiny silver on top. Rattle cans, hand painting and airbrushing are all useful techniques for painting rails and ties. Most manufacturers of model paints have a color with a name similar to “Rail Brown” or “Rust” which can be used in conjunction with sparing application of other colors to simulate rust and grime on the rails and ties.

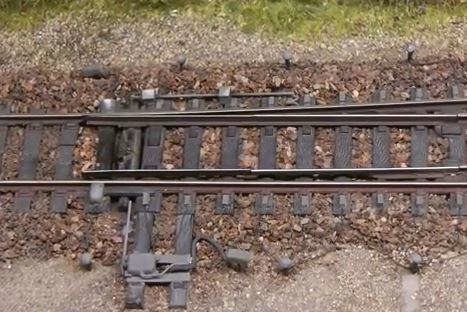
On a well-traveled high speed main line, the ties are in good shape and regularly spaced in the ballast to make the track level and smooth. Just laying your track and applying a uniform layer of ballast over the roadbed simulates this well enough. But for real interest, go look at a small storage yard or rarely used siding. The ties are often just set on the ground, irregularly spaced and angled and typically in not such great shape. To model these scenes, you’ll need to cut the tie webbing and remove individual ties or replace them with wooden substitutes. The webbing can be cut with a small diagonal pliers or a hobby knife, but if you are doing much track work at all of any kind a rail nipper such as a Xuron tool can be used as well. Scale sized individual wooden ties are available from supply houses that stock parts and materials for hand-laying track. These can be stained with washes or painted to match your yard environment, then glued in place under sections of rail where the plastic ties have be en removed.
Hand laying rails can be extremely satisfying. It is also time-consuming and requires an investment in a few specialized tools. First and foremost is a good NMRA track scale gauge. You can’t lay accurate track without one, and nobody wants derailments in a far and possibly unreachable corner of the layout. Hand laid track is attached to wooden ties with special spikes which are hard to handle unless you also have a spike driving plier. This tool holds the spike securely in the correct position to permit you to get enough leverage to push the spike into the tie without disturbing the rail spacing.
Hand laying turnouts also requires a set of templates or fixtures to hold the rails in the correct relationship for spiking wood ties or soldering to PC board tie material. The fixtures can be fairly expensive, in the $125 US range, so it’s a serious investment to hand lay rails on large layouts. Hand laying track is a modeling skill held in very high regard by other modelers. Mastering the technique will definitely make you a leader of your peer group!
Ballast laying is about the same regardless of your track construction method. The most common method is to put a small amount of ballast in a paper picnic cup and squeeze the sides to form a spout, then pour the ballast over the rails and roadbed in a smooth motion. Use a fine soft paintbrush or foam applicator slightly less wide than the distance between the rails to smooth the surface and provide an even application. Foam applicators of various sizes are inexpensive at home centers and can be trimmed with a scissors to correct widths.
Cementing the ballast is done by first applying a solution of “wet water” made with a 50/50 mix of water and alcohol, followed by a liberal soaking of the ballast with a 50/50 mix of water and white glue. When the ballast dries, a shop vac is used to collect the loose ballast, then reapply as necessary to fill in bald spots. Be sure that your painted rails have dried thoroughly before you ballast!! Once your ballast is in place, you can add detail areas around coaling or fueling stations to simulate spilled oil and waste and cinders between and around the tracks with black or grimy grey colored paints and washes.