
12 Important Steps For Creating Trouble-Free Superelevation On A Model Railroad Layout
When you have your curve and easement in place, it is then time to add the superelevation. On a real fullsize railroad the superelevation is likely to be a maximum of 6 inches. Scaling this down to a model railroad would convert to 1/16th inch in HO, and slightly over 1/32nd inch in N scale. Here’s the process:
STEP 1
Instead of using a strip of wood, this technique will use ordinary masking tape to create the superelevation. Start by cutting the ¾ inch masking tape in half length-wise with an X-Acto knife (strips of 3/8 inch wide tape). It is probably easiest doing this when the tape is still on the cardboard spool. The tape needs to have good adhesion, but you won’t need to tack the tape down in the way you might for paint masking. Cutting the tape in this way will make it easier to follow the curve.
© Copyright http://www.modelbuildings.org All rights reserved.
STEP 2
The next step is to work out roughly how many layers of tape would be equivalent equal the scale 6 inches of superelevation mentioned earlier. To save you the hassle of piling on multiple layers to work out how much you’ll need, I’ve done the calculation for you. In N scale use 8 layers of tape, and in HO scale use 14 layers of tape to reach the 6 inch elevation.
STEP 3
Decide where you want the transition to begin at each end of the curve to reach the point of maximum superelevation. Use a felt tipped pen or pencil to mark the spots. A quick bit of advice; it is not generally a good idea to begin or finish a superelevation under a turnout as this can result in derailment issues. Instead, choose a spot just as the easement into the curve starts. Be aware that straight track sections are not superelevated, so the transition shouldn’t begin there.
STEP 4
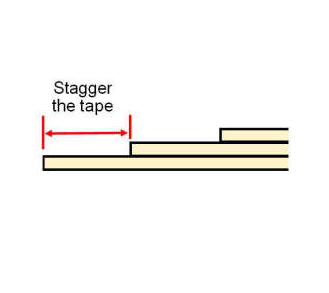
Just as with a real railroad, smooth transition into the highest point of superelevation is important. The train should ease into it, to avoid potential problems. You can divide the length of the easement by 8 for N scale, or by 14 for HO scale staggering the distance from the edge of each layer of tape added (see diagram). If you are using bigger curves e.g. a 28 inch radius or more in HO scale, you could apply a one inch stagger. This would give 14 inch run before reaching the scale 6 inch maximum superelevation.
If you stagger the layers at equal distances, the transitions approaching up towards and out of the maximum superelevation will be smooth, just as they would be on a real railroad. This will also save time and frustration in rasping or sanding stripwood.
STEP 5
Using adhesive and brads fasten down the inside-curve piece(s) of roadbed.
STEP 6
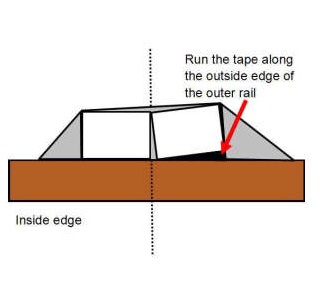
Mark the OUTSIDE (not inside) edge of the roadbed with another piece of roadbed. Take the first layer of tape to begin your first mark. Take care to lay the 3/8 inch tape along the outer edge of the outside track (see diagram), not along the center line of the easement or curve. The objective is to raise the outer edge of the outside rail, without raising the center of the ties. Then run the layer to the other mark pressing it firmly in place ensuring a solid surface for the next layer.

STEP 7
The next step is to begin the second layer of tape. This layer will begin at the first stagger (refer to diagram). Continue until you are within the stagger distance of the opposite end of the curve.
Stop at this point. Then repeat this process, adjusting in the stagger amount for each layer until the maximum superelevation layer is reached.
NOTE: Step 7 is the most laborious part of the process as each layer of tape needs to be positioned to track along the curve. However, that said, this method is much better than the traditional stripwood method which requires a woodworking plane to achieve a smooth enough transition.

STEP 8
Keep in mind that you will need 14 layers for HO scale or 8 for N scale. So, when you have applied the last layer, apply even finger pressure to press the tape down so it adheres to the layer beneath without leaving an indentation. A small ‘J’ roller is a handy tool for this purpose. Work from the center of the curve out toward the end of the easements.
STEP 9
Lay down the outside piece(s) of roadbed remembering that the outside piece is not supposed to lay flat (refer diagram). Having already laid the inside roadbed certainly helps. The center line edge of the inside roadbed provides a solid edge to hold the outside piece against, minimizing potential difficulties when using the tape. Once in place, the roadbed will hold the tape down, preventing the risk of warping in humid conditions. It is easy to trim away any excess tape that might be visible from under the roadbed, or the other option is to simply cover the excess tape with ballast.
STEP 10
Leave the roadbed to dry for at least 15 minutes before spreading a generous coating of spackle down the middle of the roadbed. Smooth it to fill any uneven gap that might exist in the center of the roadbed. A gap can be caused by the superelevated edge.
STEP 11
Depending on which filling compound you used, leave it to dry for a day or two. The roadbed can then be sand smooth. You should now have a solid base for your track.
STEP 12
Lay your track following the method your usual method, before running a train across the new section of superelevated track.
How to add more movement and excitement to your model railroad http://www.modeltraincontrols.com