
Some Proven To Be Effective Techniques For Replicating Water In Steams, Rivers, Ponds, and Puddles On A Model Railway Layout
There is no feature that makes a model either come alive or look as hopelessly “toy-like” as a water feature. There have been many techniques tried in the past to make water look real, from mirrors and glass surfaces to actual running water. Both of those are terrible choices and are rarely, if ever, used in this day and age!
© Copyright http://www.modelbuildings.org All rights reserved.
When you actually study water and its appearance, it becomes clear that the actual water substance used is only part of the secret to creating a realistic water scene. Water is a marvelous fluid. Being naturally transparent, it passes most of the color of the surface it’s flowing over. Being reflective, it also takes on the properties of the sky overhead. Making the surface color come through is fairly easy, but since the sky overhead is basically your basement ceiling, the coloring also has to offer some simulation of daylight.
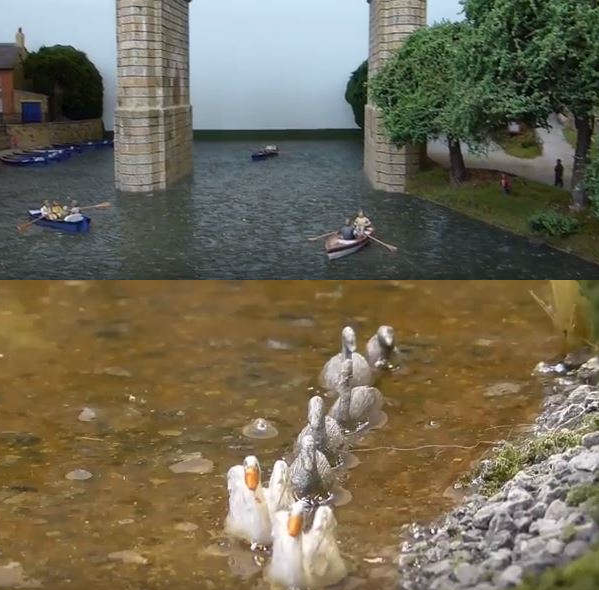
Modern art media and scenery products have made the creation of realistic water much easier. With some effort, your water feature can totally realistic and give your layout the rich drama you want.
You need to start with a good bed for your water. There are many articles and videos available to help you with the technique to make a good water bed, but they all generally break down into preparing the site with banks for the water bed, rocks and debris to appear in and around the water, and coloring of the bed to provide the illusion of depth variation. Water will always seek to flow downhill on the path of least resistance, so begin by trying to arrange your water to NOT appear to flow uphill!
Keep your banks as random and irregular as you can possibly manage. Water only flows straight when forced to do so, usually by man-made objects. Once you have a bed to your liking, paint the bed, lighter colors at the edge, blended into darker colors or even black at the deepest part of your feature.

When that paint dries, affix your boulders, rocks, gravel, tree trunks, old tires, discarded cars, weeds and grass, and whatever else your miniature world has tossed away to find its place at the water’s edge. As a last check, make sure that your water bed is sealed and absolutely water tight with no small spaces for the liquid medium to go while still wet. All of the pourable products for simulating water will seek the smallest hole and give you a nice mess if you are less than careful about containing them.
Preparation is 75% of getting the water right. Next you will have to choose what medium you will use to create the water itself. Media generally fall into two large groups. One group is a single part product, the other is a two part epoxy like product that is mixed before pouring.
For a single pour solution, Mod-Podge glossy is a choice for small ponds and puddles. It’s very easy to use, simply pour the product out of the bottle into your water feature bed. As with all products, making several shallow pours works much better than one deep pour. Mod Podge is pretty inexpensive in most art stores, however after first drying clear it does tend to turn cloudy over time. If you want the effect of slightly polluted standing water, this is no problem.
If you want larger areas of clear water, consider Woodland Scenics Realistic Water or E-Z Water products. These are both single-component products that are extremely easy to use. Realistic Water comes in a bottle and you just pour to the desired depth (using a number of shallow pours, remember). E-Z water is a pelletized product that you heat in an old pan and pour when liquefied. Both cover well and dry clear. For ripple effects, E-Z Water can be reheated with a heat gun and molded into ripples with a soft brush or orange stick type of tool.
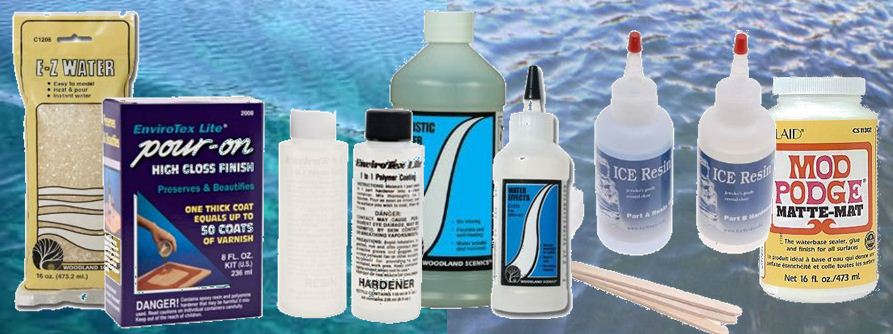
Artists’ gloss medium, such as Liquitex, is another single component product that can be used to model water. Liquitex is available in several consistencies from a paste like product to a paintable color. Use the clear, thinner product to pour the water, and the paste consistency product in white color for whitewater and ripple accents. Remember to pour in shallow layers, and have a couple of cheap brushes of different widths to spread as necessary. The thinner gloss media usually dries without brush strokes.
Still another single component is Busch Aqua Model water. Like the Woodland Scenics products, it can be poured right from the bottle into the stream or lake bed.
One of the most popular resin based (two component) products is Envirotex. The resin and hardener must be thoroughly mixed before pouring, so you’ll need a container in which to mix the products. Use a large paper or plastic cup and only mix as much as you’ll need for each pour, as the product starts to cure as soon as components are mixed. If you use a paper cup, you can form a spout with it to apply the product when mixed. Envirotex flows well into spaces and requires about 24 hours to cure. You’ll likely want to spread your water pour out over a couple of days to get the effect you like for your water
A company called Unreal Details also has a two component product they call Magic Water. Its use is quite similar to Envirotex and should be mixed and handled in the same way. For whitewater and ripple effects, the stiffer consistency of Liquitex medium can be used, or try one of the commercial products by Woodland Scenics such as Water Effects. Apply on top of your poured water next to rocks and obstructions, then use a dry-brushing technique with a bit of white to get the wave action looking just right.