Use This FREE Model
Railroad
Helix Design
Calculator To
Avoid Frustrating
Construction Mistakes!
This page includes a lot of helpful information and sketches to assist you with planning construction of a helix for your model railroad layout.
Firstly, here is a tool to help you with important measurements including the track radius and required headroom. This helix calculator will do most of the mentally difficult calculations for you with a simple click of your mouse.
Enter the details and it will calculate measurements for percent grade, ring diameter, number of rings needed, along with the quantity of material needed. Simply enter the numbers you want and adjust them until you obtain results that will be suitable for what you want to construct.
How to Use This Calculator For Planning and
Constructing a Model Railroad Helix
IMPORTANT : Before
entering any numbers we recommend you read the
“INPUT GUIDE” below this calculator. It explains how to input the correct
numbers.
|
|
- A. Enter the track radius (inches):
MUST BE BETWEEN 4 and
100
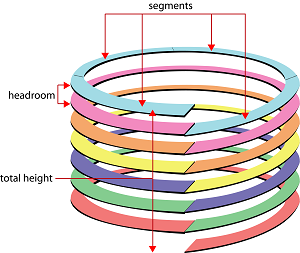
This is the radius of the curved track you plan to use. - B. Enter the greatest height of train (inches):
MUST BE BETWEEN .5 and
50
This is the height of the tallest loco (or fully laden rolling stock) you will run on the helix. - C. Enter the total height to climb (inches):
MUST BE BETWEEN 3 and
96
This is the distance (in inches) between the track entry and exit (bottom and top) of the helix. - D. Enter the width of ring (inches):
MUST BE BETWEEN 1 and
24
This is how wide the rings are to carry the track. - E. Select the segments per layer (a whole
number): MUST BE BETWEEN 2 and 8 (* NO Decimal
Values)
This is how many pieces of material you want to use to make one complete ring.
Understanding The Results
-
F. Ring diameter is in inches. The track radius x 2 + 4"
-
G. Vertical distance between rings is the inches between the rings with a 1/2" allowance for the thickness of ring material (plywood). The train height you entered (B) + 1/2" track height + 1/2" for layer material thickness.
-
H. Ring circumference is inches of each ring. The ring diameter you entered (F) x 3.14
-
I. Grade is a %. A bigger track radius can be entered if the grade is too steep
-
J. The number of rings needed. The total height to climb (C) divided by the vertical distance between the rings (G)
-
K. Each segment length in inches based on what you selected (E). The ring circumference (H), divided by the segments per layer (E).
-
L. Total material length is in inches. The quantity of rings needed(J) x ring circumference (H).
-
M. Total material required in sq ft. Total material length (L) x ring width (D), divided by 144 (a square foot), and based on a 32 sq. ft. sheet of plywood
What is a helix?
A helix is like a ‘spiral-staircase’ for trains, because it enables them to climb in height from one level on a model railroad layout to another in the smallest space possible. The trains basically go around in circles gradually climbing higher and higher with each 360 degree rotation (circumference).
A helix is simply a winding gradient (slope or grade) that goes around in circles. Helix’s can be very effective visually and very efficient from a space-saving point of view.
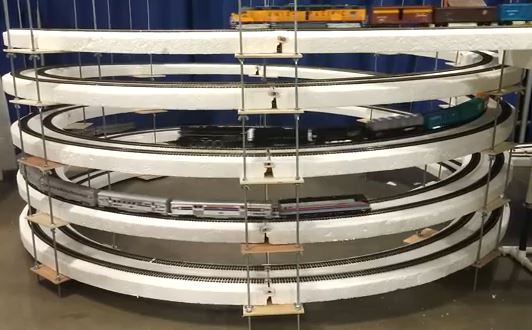
This helix on display at a train show has a 3.5% grade and 158 feet of double track.
However, figuring out the measurements and material requirements can be a bit baffling at first. The design not only needs to work geometrically, but the locomotives and cars need to be able to navigate the various levels without derailing and crashing from a great height. The locomotives need to be powerful enough to cope with both the climb and descent.
The above calculator will help you calculate the required measurements and dimensions, and also help you understand how they interact when designing a helix.
How does a helix work?
There are three keys to a success helix design: RISE, RUN and RADIUS. Getting the measurements right for these three values is the critical part of designing a workable helix. When you use the free helix calculator (above), you will see that changing any one of these measurements will impact on all other measurements. This is why this calculator is so handy; you can fiddle around with it until you get the dimensions you require. As an example; the track radius will influence the required “RUN” for a helix ring.
It doesn’t matter whether you have 100 inches of track climbing a grade in a straight line, or whether that same track goes around 360 degrees in a circle, it is still 100 inches of track. I say that because, when the track goes around in circles it is easy to get confused. So the length of the track (whether it’s in a straight line or in a circle), will determine the grade (gradient) of the climb.
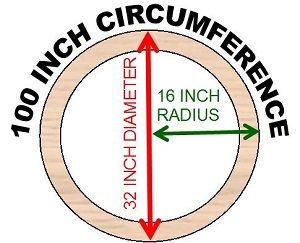
The radius of each helix ring will depend on the track radius. However; just because you are using 18” radius track, it doesn’t mean the radius of the helix rings is also 18”. Track radius is actually measured from the center of the ties, and not from the outer edge of the track. For this reason the radius of each ring might need to be around 20” to 22”. This is because you will need a safety margin on each side of the track so the trains are not running along the edge.
How do you calculate the RUN or length of a helix ring?
Put simply, the RUN or length is the circumference of the circle, but to calculate that you first need to know the radius and diameter. Fortunately, that is usually the easiest to work out.
The circle diameter is twice the radius, so if the circle made from 22 inch radius segments, then the diameter (circle width) will be 44 inches. When you know the circle diameter it is then possible to work out the circumference of the circle (the run on the helix ring).
Here’s the formula to calculate the circumference around the outer edge of the circle.

Using the above formula you simply multiply the (known) diameter by the pi (π ) value which is 3.14. The result is the (unknown) circumference.
As an example; if the diameter is 44” the circumference would be 138” (44 inches x 3.14). The real answer is actually 138.16 inches, but 138 inches is close enough.
So, the helix ring could need to be a fraction over 138 inches. Converted this calculates out at 11 feet 6 inches (approx). Therefore each ring will need around 11 feet 6 inches of materials and 44 inches of space.
How do you calculate the RISE or headroom of a helix ring?
Use the free railroad grade calculator on this website to calculate the RISE or grade.
If the tallest locomotive or piece of loaded rolling stock is 2 ½” tall, then it would make sense to allow at least a 3” headroom or rise. So the separation (headroom) between each ring would be 3 inches.

I haven't got room to show you a grade on 100 inches of track (the web page is too narrow) so I've scaled the diagram down. That's why the 2 inch rise looks smaller in the drawing below.

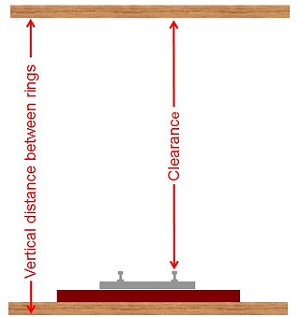
Using the earlier measurements, the RUN is 138 inches. The ring separation is to be 3”, but will the locomotives be capable of hauling trains up that grade? The answer will depend on the length of run. The shorter the run - the steeper the grade.
So using the free grade calculator mentioned above; a 138 inch run that rises 3 inches gives a grade of 2.17% which is not too steep.
If you want the grade to be exactly 2% with the same rise of 3 inches, then here’s how to calculate the length of run.
That tells us what our grade will be when we know the run and the rise. But suppose we want to figure it the other way. Suppose we want a 2% grade exactly, with a 3” rise? How long a run will we need to hit the 2%? To calculate this you need to work out what number divided into 3 inches equals 2%. Simply divide 3 inches by 0.02 (this is the same as 2%) and the answer is 150 inches.
The diameter can be therefore calculated like so: Circumference 150” = Diameter x 3.14. That’s the same as 150”/3.14 = 47.77” diameter (call it 48 inches). This then makes the radius 24 inches (half 48 inches).
What is the vertical distance for a model railroad helix design?
Obviously the smaller the grade the more rings you might need in your helix for the train the climb to the top or get back down again. That’s where the vertical distance is so important. If it’s too high, the required number of helix rings or the ring diameter might prove impractical. The vertical distance is a straight line from the top to bottom, not the track length around the rings from top to bottom.
As an example; a helix with a vertical distance of 36 inches with a 2 inch rise would need 18 rings, whereas only 9 rings would be needed if the rise was 4 inches. So a gentler grade would require more rings (and more materials).
Another factor to consider is the type and thickness of material you choose to build your helix. If you choose ½ inch plywood, as an example, you would need to add ½ inch headroom to determine the vertical spacing between the rings.
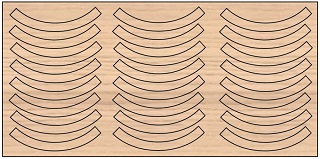
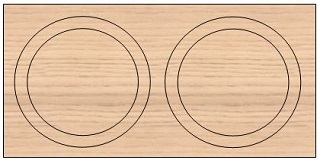
Also consider how many rings you can cut from your sheet of ply and how you can get the most from each sheet with minimum wastage. A standard plywood sheet measures 48” x 96” (4ft x 8ft). With a ring radius of 48” and a ring width of 6”, then you would only be able to cut two complete 6” wide rings, and end up with 2 big circles with a lot of wastage from the 4ft x 8ft plywood sheet.
 |
 |
The better option is to cut the rings into sections which you could join together end-to-end to complete each ring.
Another factor to consider is the minimum acceptable track curve radius for the scale you are working in. In HO scale 18 inches is considered by many to be the minimum (some say 15”), but it also depends on the type of rolling stock you are operating.
So as you will have gathered by now, there are numerous inter-related factors that need to be considered when designing and constructing a model railroad helix.
