
Solenoid Turnouts and Flipping the
Switch On Model Railways
Model turnouts are available in two basic forms. They either include a switch machine, most often the solenoid type, or have no switch machine. Solenoid equipped switches (Atlas brands their model as a “Snap Switch”) are very easy to install. All that is required is to run the three control wires to whatever electrical switch you choose to use for your railway. They are usually provided with a momentary contact switch that will operate the solenoid from the AC accessory bus of a power pack.
As your layout grows, the home run wiring from each turnout to its control point will get more and more complex. The amount of real estate consumed by the switching control panel will also expand about 1 square inch (6.3 sq. mm) every time you add a remotely controlled turnout.
© Copyright http://www.modelbuildings.org All rights reserved.
Solenoid Turnouts on Model Railways
Solenoid turnouts also come in single coil and dual coil models. There is not a lot of difference in how they actually operate the railway turnout, and the single/dual choice is a manufacturer design constant rather than a desirable modification you would want to do yourself. In operation, the solenoid is energized by pressing the momentary contact of the control switch. A single brief press is all that should be done. Holding the switch down will cause damage to the solenoid.
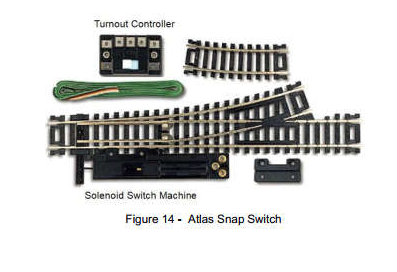

They are not meant to be continuously energized and will soon burn out if abused. Although solenoid switch machines are relatively inexpensive at around $7-10 US and can be mounted beneath the railway layout, they most often come attached to the turnout and are mounted above the layout. Locomotive overhang can be a problem, as is the lack of prototypical appearance when the turnout is mounted this way.
Be sure to plan the diverging route so that cowcatchers or coupler pockets don’t hang up on the switch machine. It is possible to disguise the solenoid by placing a structure over it, but such a device doesn’t really work well if you are building a yard ladder with several turnouts in a line.
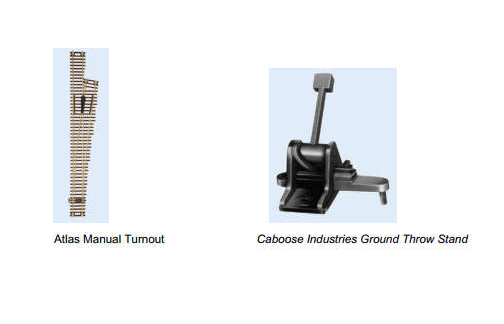
Turnouts that are supplied with no machine are meant to be installed with either a remotely controlled “stall motor” machine, an RC model servo, or a manual turnout lever. They all have a small hole in the long tie that joins the switch points (called the head rod or throwbar) into which a small wire is inserted from beneath. The wire is moved back and forth by either a manual throw rod installed at the side of the layout near the turnout, or the motor arrangement, mounted just under the turnout beneath the railway layout.
The manual operation is controlled from a knob that is pulled out or pushed in by the engineer as the rolling stock moves through the switch. This is exactly the same operation that prototype manual switches use, and in fact a company called Caboose Industries makes scale switch stands specifically made for this use. Rather than a knob on the layout fascia, the switch stand is located next to the turnout and is thrown from side to side manually. For both types of manual operation, you should include some kind of position target signal to let the engineer know which way the turnout is lined to keep inadvertent train derailments to a minimum.
Model Railway Switch Machines
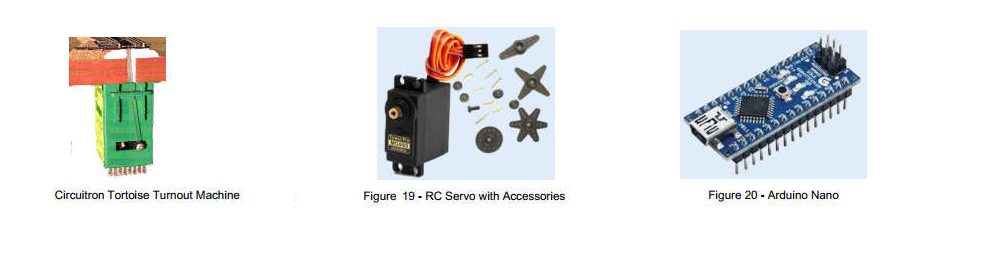
Turnout motors and RC servos provide a very prototypical slow-motion operation. You do pay for the realism. Switch motors by Circuitron (“Tortoise”), DCC Concepts and Switchmaster are all in the $20 US each prices range. Although there are also multiple unit discounts, it’s still costly to equip a large layout with special purpose slow motion switch machines. Mounting hardware is extra, as are the electronics that you might want to use to control the machine. The Circuitron Tortoise shown in Figure 18, below, also shows the method of connection to the turnout throwbar.
For inexpensive slow motion control, a radio control model servo can be used. Small model servos can be had from internet sources for under $5 US, and controlling them with a simple Arduino microcontroller is easily done. Much detail on how to use servos and microcontrollers is available from a Google search, so details of that kind of installation are not covered here.
Recommended resource http://www.modeltraincontrols.com
Mounting options are entirely your affair, as servos come in a wide range of sizes. If an Arduino board is used to control servos, that same board can also be programmed to be a stationary DCC decoder. This makes a very nice and convenient control point, particularly if you are planning to move into medium or large scale computer control based on Java Model Railroad Interface, or JMRI.